
Ankle Dorsiflexion for Pistol Squats: The Research-Backed Requirements (With Drills)
Pistol squats demand 35–45° of ankle dorsiflexion — more than most people can produce. Here's what the studies say, how to test your own range in 60 seconds, and a 4-week program to get there.
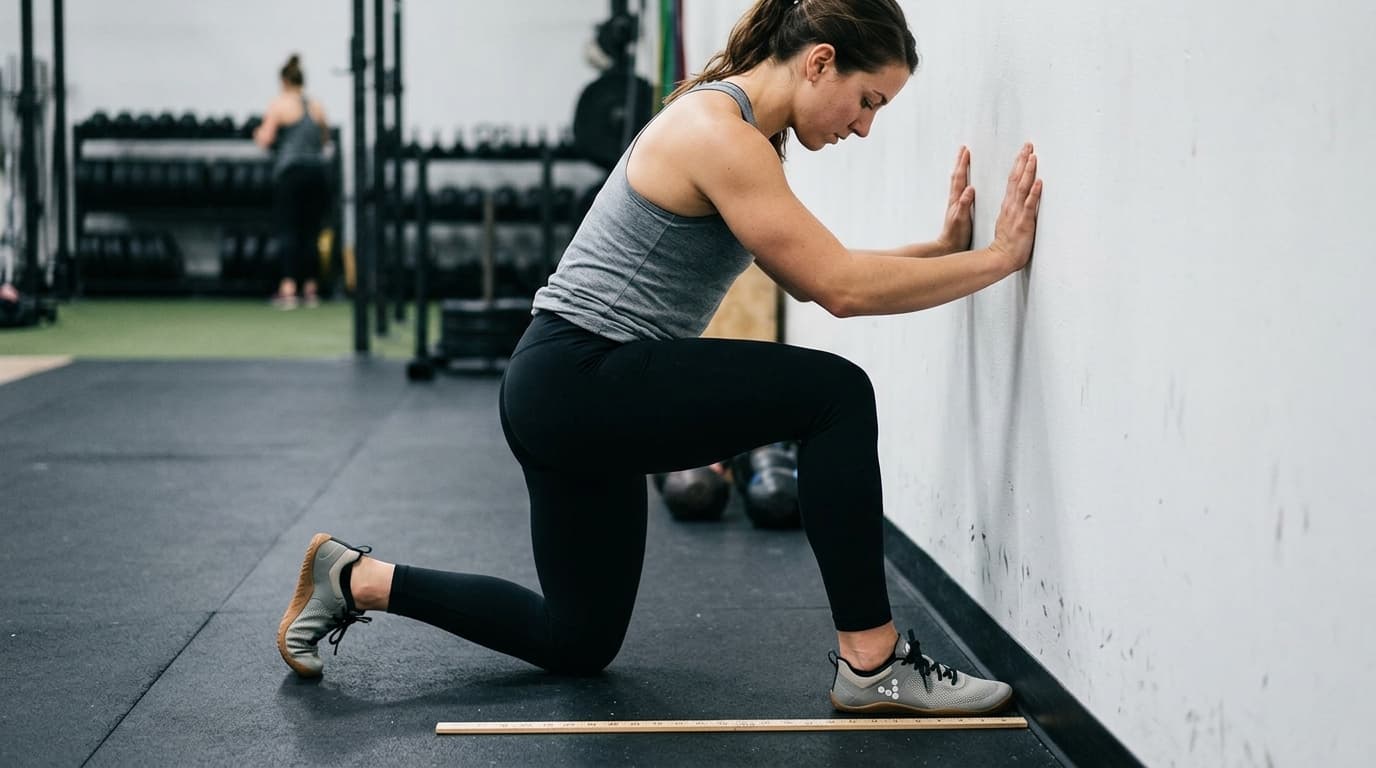
TL;DR — Key Takeaways
- Pistol squats require 35–45° of ankle dorsiflexion — Kasuyama et al. (2009) measured ~38.5° for a heels-down deep squat; single-leg loading pushes the demand toward the upper end of that range.
- Test yourself in 60 seconds with the knee-to-wall test — if you can't drive your knee 10 cm past your toes to touch a wall (heel flat), limited dorsiflexion is blocking your squat.
- Four weeks of daily work moves the needle — combine bent-knee calf stretching, banded joint mobilization, and loaded dorsiflexion drills for the fastest gains.
What Is Ankle Dorsiflexion?
Definition: Ankle dorsiflexion is the movement of pulling your foot toward your shin — the upward bending of the ankle joint. In squatting, it describes how far your shin can travel forward over your foot while your heel stays flat on the ground. The more dorsiflexion available, the deeper you can squat without compensating.
The two primary muscles that limit dorsiflexion are the gastrocnemius (the larger calf muscle that crosses the knee) and the soleus (the deeper calf muscle that does not cross the knee). Tightness in either — or both — restricts how far your shin can travel forward. Bony impingement at the front of the ankle joint is a less common but harder-to-fix restriction, often the result of prior ankle sprains or bone spurs.
Dorsiflexion range of motion (ROM) is typically measured in two ways: non-weight-bearing (lying down, moving the foot passively) and weight-bearing (standing, with load through the joint). For squatting, weight-bearing dorsiflexion is the relevant measure because it replicates the actual joint demands. The knee-to-wall test — covered in Section 3 — is the gold-standard field measure for weight-bearing dorsiflexion.
Normal functional dorsiflexion for everyday walking is around 10–15 degrees. But squatting to full depth — and especially single-leg squatting — demands far more than that. If you've ever noticed your heels rising or your torso collapsing forward at the bottom of a squat, restricted dorsiflexion is almost certainly part of the problem.
How Much Dorsiflexion Does a Pistol Squat Require? (The Studies)
The research consensus: a pistol squat requires approximately 35–45 degrees of ankle dorsiflexion at full depth. This is 2–3× what normal walking demands, and more than the majority of untrained adults can produce without targeted mobility work.
Study 1: Hemmerich et al. (2006) — Deep Squat Dorsiflexion Requirements
Published in the Journal of Orthopaedic Research (2006), this study measured hip, knee, and ankle kinematics during high-range-of-motion daily activities — kneeling, cross-legged sitting, and deep squatting.
Key finding: Deep-flexion tasks like squatting demand substantially more ankle dorsiflexion than everyday walking, establishing that squatting to full depth is a high-ROM activity the ankle must be specifically prepared for — not something most daily movement patterns train.
Relevance to pistol squats: The pistol squat adds single-leg stance on top of deep knee flexion. With no bilateral base of support to share the load, the demand on the planted ankle is higher than in a standard two-legged deep squat.
Study 2: Kasuyama et al. (2009) — Squat Posture and Ankle ROM
A 2009 study in the Journal of Physical Therapy Science examined 71 healthy men, dividing them into a group that could perform a heels-down deep squat and a group that could not, then measured hip, knee, and ankle range of motion in each.
Key finding: Ankle dorsiflexion flexibility was the factor most strongly associated with the ability to reach a full heels-down squat. The study reported an ankle dorsiflexion requirement of approximately 38.5 degrees for the deep squatting posture, alongside supporting hip and knee flexion ranges.
Study 3: Dill et al. (2014) — Dorsiflexion Deficits and Squat Mechanics
Published in the Journal of Athletic Training (2014), this study divided 40 physically active adults into groups with limited and normal weight-bearing-lunge ankle dorsiflexion and analyzed their squat and jump-landing kinematics.
Key finding: Greater ankle dorsiflexion during the weight-bearing lunge was associated with more knee flexion and altered frontal-plane knee movement during squatting — confirming that ankle range measured this way predicts real compensations at the knee during a squat, the same joint chain involved in a pistol squat.
Study 4: Baumbach et al. (2014) — Ankle ROM Normative Values
A 2014 biomechanical study in BMC Musculoskeletal Disorders measured weight-bearing dorsiflexion at different knee positions, finding an average of 25° with the knee fully extended, rising to about 39° once the knee was bent 20° or more — because bending the knee slightly takes the gastrocnemius out of the equation.
Why this matters: Even with the knee bent, the average person's dorsiflexion sits right around the threshold a deep squat requires — with little to spare for the added single-leg demand of a pistol squat. Dorsiflexion is not a "nice to have" for this skill — it is a hard prerequisite that requires active training for most people.
| Task | Dorsiflexion Required | Source |
|---|---|---|
| Normal walking (heel strike) | 10–15° | Perry & Burnfield (2010) |
| Parallel squat (bilateral) | ~35° | Kasuyama et al. (2009) |
| Deep squat (below parallel) | ~38.5° | Kasuyama et al. (2009) |
| Single-leg deep squat / pistol squat | 40–45° (estimated) | Dill et al. (2014) + Kasuyama et al. |
| Average adult, knee bent 20°+ (weight-bearing) | ~39° | Baumbach et al. (2014) |
How to Test Your Own Dorsiflexion Range
The weight-bearing lunge test (WBLT), also called the knee-to-wall test, is the most reliable field measure of functional ankle dorsiflexion. Konor et al. (2012) in the International Journal of Sports Physical Therapy confirmed it has excellent intra-rater reliability (ICC = 0.97–0.99) — meaning it's accurate enough to use at home without equipment.
Step-by-Step: The Knee-to-Wall Test
- Set up barefoot facing a wall. Remove shoes — they introduce heel elevation that artificially improves your apparent range.
- Place your big toe 10 cm (4 inches) from the wall. Use tape or a ruler for precision.
- Drive your knee forward directly over your second toe to touch the wall. Keep your heel completely flat. Do not let the arch collapse or the foot roll inward.
- If you succeed at 10 cm: move your foot back 1 cm at a time until you find the maximum distance at which you can touch the wall. Record this number.
- Test both sides. A difference of more than 1–2 cm between legs is meaningful and indicates asymmetric restriction.
| Knee-to-Wall Distance | Dorsiflexion Estimate | Pistol Squat Readiness |
|---|---|---|
| Under 8 cm | <30° | Not ready — significant restriction |
| 8–10 cm | ~32–36° | Borderline — will compensate |
| 10–12 cm | ~36–42° | Adequate for most pistol squats |
| Over 12 cm | >42° | Excellent — ankle is not the limiter |
Bonus Test: Bony vs. Soft-Tissue Restriction
Perform the knee-to-wall test twice: once with your knee straight (stressing the gastrocnemius) and once with your knee bent about 20–30 degrees (offloading the gastrocnemius). If your ROM improves noticeably with the knee bent, the restriction is primarily the gastrocnemius — it responds well to stretching. If ROM does not change, the soleus or a bony/capsular restriction is the culprit, and joint mobilization work becomes more important than stretching.
Why Limited Dorsiflexion Blocks Your Pistol Squat
Dorsiflexion restriction doesn't just make the pistol squat look ugly — it makes it biomechanically impossible. When the ankle can't flex enough, the body creates compensations that are hard to override through strength or willpower alone.
Compensation 1: Heel Rise
The most visible sign. When the ankle can't travel forward far enough, the heel lifts to allow the shin to continue moving. In a bilateral squat, you can sometimes get away with this. In a pistol squat, lifting the heel on the working leg shifts your entire center of mass backward, causing an uncontrolled fall.
Compensation 2: Knee Valgus Collapse
Dill et al. (2014) showed that weight-bearing-lunge dorsiflexion range predicts altered knee movement during squatting. When the ankle runs out of forward travel, the knee often finds a different path to compensate — a movement quality issue that can also raise injury risk over repeated reps.
Compensation 3: Excessive Trunk Lean
To keep the center of mass over the foot, the torso pitches dramatically forward as the ankle restriction prevents normal shin travel. This turns what should be a quad-dominant pistol squat into a hip-dominant good morning on one leg, and makes the free leg difficult to hold parallel to the floor.
Compensation 4: Shortened Range of Motion
Many people who think they're "failing" their pistol squat attempt are actually stopping 20–30° short of full depth because the ankle has run out of range. They may have the hip mobility, the quad strength, and the balance — but the ankle is a hard mechanical ceiling.
This is why cueing "sit deeper" or "keep your chest up" during a pistol squat rarely works when dorsiflexion is the underlying problem. These are instructions to override a mechanical limit — the ankle literally cannot produce the required range, so the body finds a workaround. Fix the ankle first.
"Most people who've 'plateaued' on their pistol squat aren't weak or unbalanced — they're out of ankle range. No amount of quad strength fixes a joint that has physically run out of room to bend."
For a complete breakdown of the progression steps once your ankle mobility is in order, see our full pistol squat progression guide.
The 4-Week Ankle Mobility Program
This program applies three evidence-based mechanisms in sequence: passive lengthening of tight muscles (weeks 1–2), joint mobilization to address capsular restriction (weeks 2–4), and loaded dorsiflexion training to make new range functional under load (weeks 2–4). A 2024 randomized controlled trial in PLOS One found an 8-week program combining stretching, joint mobilization, and strengthening produced a significant ~7° improvement in restricted dorsiflexion; combining mobilization with stretching from the start, as this program does, is a reasonable way to accelerate that timeline.
Weeks 1–2: Passive Range — Calf Stretching
Daily, ~10 minutes
A. Straight-Leg Calf Stretch (Gastrocnemius)
- Stand facing a wall with hands on the wall for support
- Step one foot back into a long lunge, back knee straight
- Press your back heel firmly into the floor and lean forward slightly
- You should feel a deep stretch in the upper calf
- Duration: 3 × 60 seconds per side
B. Bent-Knee Calf Stretch (Soleus)
- Same wall position as above, but step the back foot closer to the wall
- Bend the back knee slightly (15–20°) while pressing the heel down
- You should feel the stretch lower in the calf, closer to the Achilles
- Duration: 3 × 60 seconds per side
- Key: If ROM improves in this version vs. straight-leg, the gastrocnemius is your primary restrictor
C. Knee-to-Wall Practice
- Perform the knee-to-wall test as a drill: 2 × 15 slow reps per side
- Pause at end range for 2 seconds each rep
- Focus on heel staying flat and knee tracking over second toe
Weeks 2–4: Joint Mobilization — Banded Ankle Distraction
Daily or before training, ~5 minutes
Banded ankle distraction works by pulling the talus (ankle bone) posteriorly, reducing anterior impingement that limits how far the shin can travel forward. This is the mechanism validated by Hoch et al. (2012) in the Journal of Orthopaedic Research, who found it significantly improved dorsiflexion in people with chronic ankle instability.
Setup
- Anchor a heavy resistance band (50–80 lb) at ankle height to a stable post
- Loop the band around your ankle, just above the joint line, at the front
- Step away from the anchor until the band is taut
Execution
- With the banded foot flat and pointing forward, lunge the knee slowly over the toes
- Travel as far as you can without the heel rising — hold 2 seconds at end range
- Return to start. Repeat 15–20 times per side
- Sets: 2 sets per side, daily
Weeks 2–4: Loaded Dorsiflexion — Own the New Range
3× per week, ~10 minutes
Passive stretching creates the range; this section trains your body to use it under load — a requirement for squatting. Without loaded practice, newly gained ROM won't show up in your pistol squat.
A. Elevated-Heel Squat (Heel Elevation Reduction)
Stand with heels on a 1-inch plate or wedge. Squat slowly to maximum depth, 3 seconds down. 3 × 8–10 reps. Each week, reduce the heel elevation by half — targeting zero elevation by week 4.
B. Loaded Knee-to-Wall
Hold a 5–15 lb dumbbell at chest height. Perform the knee-to-wall drill with this load. 2 × 12 per side. The load challenges your ability to maintain position at end range.
C. Single-Leg Box Squat (Slow Eccentric)
Stand on a box or step. Lower onto one leg slowly (4–5 count), going as deep as your dorsiflexion allows. 3 × 6–8 per side. Lower the box height each week as range improves.
Weeks 3–4: Integration — Transfer to Pistol Squat
3× per week, within lower-body sessions
A. Counterbalance Pistol Squat
Hold a 5–10 lb plate or dumbbell in front of you as a counterweight. This shifts your center of mass forward, reducing the dorsiflexion demand while you build the movement pattern. 3 × 5 per side.
B. Heel-Elevated Pistol Squat
Place the working heel on a 1-inch platform. Perform full pistol squats with this elevation. Each week, reduce the platform height — targeting flat-foot pistol squats by week 4. 3 × 5 per side.
Week 4: Retest
Repeat the knee-to-wall test. Most people gain 2–4 cm in 4 weeks with daily work. If you're at 10+ cm, proceed to flat-foot pistol squat progressions. If not, extend the program by 2 weeks and retest.
Ankle Mobility Drills Ranked by Research Evidence
Not all ankle drills are equally supported by research. This table ranks the most common approaches by the quality of evidence for improving weight-bearing dorsiflexion — the specific measure that matters for squatting.
| Drill | Mechanism | Evidence Level | Best For |
|---|---|---|---|
| Banded ankle distraction | Joint mobilization (posterior talus glide) | High — RCT evidence (Hoch et al., 2012) | Capsular restriction, chronic ankle instability |
| Bent-knee calf stretch (soleus) | Muscle lengthening | High — part of Sohrabi et al. (2024) RCT | Soleus tightness (most people) |
| Straight-leg calf stretch | Gastrocnemius lengthening | High — well-established | Gastrocnemius tightness |
| Loaded knee-to-wall drill | Loaded end-range training | Moderate — supported by motor learning principles | Transferring range to squat pattern |
| Heel-elevated squats | Loaded ROM, progressive reduction | Moderate — widely used clinically | Integrating range into squat depth |
| Ankle circles / rolling | Synovial fluid distribution, neural warmup | Low — no ROM improvement in research | Warmup only, not for ROM change |
| Foam rolling calves | Myofascial release, transient relaxation | Low — acute effect only, largely gone within 20 minutes | Pre-stretch warmup, not standalone |
The takeaway: ankle circles and foam rolling have their place in a warmup, but if you're spending most of your mobility time on these and wondering why your dorsiflexion isn't improving, that's your answer. Prioritize banded distraction and calf stretching for lasting ROM change.
Common Mistakes When Training Ankle Mobility
Most people who have been "working on ankle mobility" for months without progress are making one of these five mistakes. Fixing even one of them can unblock weeks of stalled progress.
Mistake 1: Only Doing Straight-Leg Stretching
The straight-leg calf stretch only addresses the gastrocnemius. If the soleus is your primary restrictor (very common), you can stretch for months and see minimal improvement in squat dorsiflexion. Always include the bent-knee variant. Check which version produces more range in your knee-to-wall test — that tells you which muscle is the limiting factor.
Mistake 2: Stretching but Never Loading the New Range
Passive stretching creates temporary increases in range of motion that won't reliably show up under load unless you train them. If you stretch daily but never do loaded dorsiflexion work (banded lunges, heel-elevated squats, single-leg box squats), your nervous system won't allow the new range when the ankle is under compressive squat load. Loaded practice is the transfer mechanism.
Mistake 3: Wearing Shoes During Mobility Work
Most athletic shoes have a heel-to-toe drop of 6–12 mm. This artificially shortens the calf complex all day long, counteracting the stretching you do in training. Do all ankle mobility work barefoot. If you wear shoes to the gym, do your ankle drills before putting them on, or do them at home. Consistently wearing minimalist or zero-drop footwear speeds dorsiflexion gains significantly.
Mistake 4: Ignoring Side-to-Side Asymmetry
A 2011 normative study by Hoch & McKeon in Manual Therapy found normal side-to-side variation in the knee-to-wall test averages close to zero but can range roughly ±2.7–2.9 cm even in healthy adults — so a small difference isn't automatically a problem. A gap noticeably beyond that range, though, usually traces back to a dominant-foot pattern or a prior sprain. If you find one, spend extra time on the restricted side: a 2:1 ratio (restricted:non-restricted) in your stretching and mobilization sets.
Mistake 5: Training Ankle Mobility Once a Week
Connective tissue adaptation (ligaments, joint capsule, tendon extensibility) responds to frequency, not just volume. One long stretch session per week is a much weaker stimulus than short, frequent sessions spread across the week. The 2024 PLOS One trial referenced earlier delivered its corrective program 3 times a week and still produced a meaningful ~7° gain in 8 weeks — daily practice is a reasonable way to compress that timeline further. If you can only train three days a week, do your ankle work daily anyway as a standalone 10-minute practice — it requires no equipment and no recovery.
Once your ankle mobility is in order, you'll still need to build the specific strength and balance required for the full movement. Check the pistol squat progression guide for the complete strength pathway, and the jumping jacks vs. pistol squats breakdown for context on where the pistol squat fits in a broader lower-body program.
Frequently Asked Questions
How many degrees of dorsiflexion do you need for a pistol squat?
What is the knee-to-wall test for ankle mobility?
Why does limited ankle dorsiflexion affect pistol squats so much?
How long does it take to improve ankle dorsiflexion?
Is limited ankle dorsiflexion bony or soft tissue?
What are the best drills to improve ankle dorsiflexion for squatting?
Build Mobility and Strength Into the Same Week
Create a weekly bodyweight plan that balances lower-body strength, mobility work, recovery, and the time you actually have available.
Build My Free Weekly Plan